> ## Documentation Index
> Fetch the complete documentation index at: https://docs.reddy.io/llms.txt
> Use this file to discover all available pages before exploring further.
# Call Records
> Locate, filter, and review call records in Reddy
## Locating Call Records
Access call records from the **Home** dashboard to review both training simulations and live calls.
**Switch Between Training and Live:**
 * Click **Training** or **Live** to switch views
* The active button turns purple and displays those records
* Default view shows training records
Contact your Reddy Project Manager to change the organization-wide default to show live call records instead.
View an agent's call records directly from their profile:
1. Click **Employees** in the left navigation panel
2. Search for and click the agent's name
3. In the agent side panel, click **See Full Profile**
* Click **Training** or **Live** to switch views
* The active button turns purple and displays those records
* Default view shows training records
Contact your Reddy Project Manager to change the organization-wide default to show live call records instead.
View an agent's call records directly from their profile:
1. Click **Employees** in the left navigation panel
2. Search for and click the agent's name
3. In the agent side panel, click **See Full Profile**
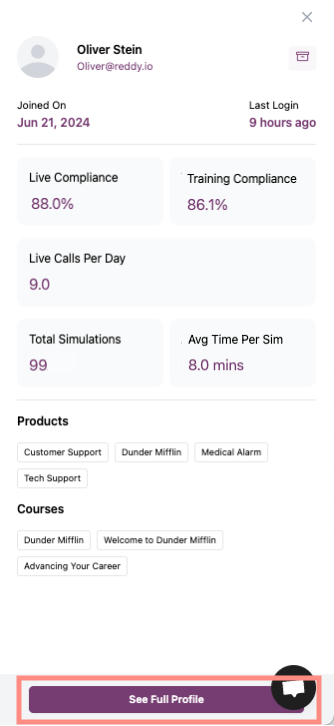 4. Click **Training** or **Live** to switch views and locate call records in the table
You can also access agent profiles by clicking an agent's name in any home dashboard table, then following steps 3-4 above.
In the dashboard view, you'll see a table with all relevant training simulations or live calls. Use filters to narrow results and find specific calls.
## Filtering Call Records
Reddy uses a dynamic filtering system that defaults to the last 2 weeks of call records (excluding calls under 1 minute).
### Filter Types
Available for both training and live calls:
* **Agent Name/Email:** View specific agents
* **Manager Name/Email:** Filter by manager
* **Product:** Filter by assigned products
* **Date Range:** Custom time periods
* **Duration:** Filter by call length (minutes)
* **Compliance Score:** QA performance thresholds
Additional filters for training simulations:
* **Recipe:** Filter by scenario within a training simulation
* **Training Name:** Specific training simulations
* **Training Type:** Category of training
* **Training with Recipe:** Simulations that include scenarios
A training simulation represents a call type (e.g., Refund Request). Recipes are the scenarios within it (e.g., refund via store credit, refund to card, overcome objection with discount).
Add organization-specific filters for live calls (e.g., hire date, ad campaign, sales closed) by sending custom metadata via API.
[Add metadata to calls](/guides/add-call-metadata)
### Using Filters
**Apply Filters:**
1. Click **Add Filter** to open the filter menu
2. Select your desired filter options
3. Click **Apply Filter** to update the dashboard
**Edit Active Filters:**
Click any active filter pill to adjust it directly without reopening the filter menu.
**Reset Filters:**
Click **Reset Filters** to clear all active filters and return to default view.
Save frequently used filter combinations for quick access. Your last-used preset automatically applies when you load the dashboard.
1. Configure your desired filters
2. Click **Apply Filter** to update the dashboard
3. Click the menu icon (⋮) in the right corner of the filter bar
4. Select **Save as Preset**
4. Click **Training** or **Live** to switch views and locate call records in the table
You can also access agent profiles by clicking an agent's name in any home dashboard table, then following steps 3-4 above.
In the dashboard view, you'll see a table with all relevant training simulations or live calls. Use filters to narrow results and find specific calls.
## Filtering Call Records
Reddy uses a dynamic filtering system that defaults to the last 2 weeks of call records (excluding calls under 1 minute).
### Filter Types
Available for both training and live calls:
* **Agent Name/Email:** View specific agents
* **Manager Name/Email:** Filter by manager
* **Product:** Filter by assigned products
* **Date Range:** Custom time periods
* **Duration:** Filter by call length (minutes)
* **Compliance Score:** QA performance thresholds
Additional filters for training simulations:
* **Recipe:** Filter by scenario within a training simulation
* **Training Name:** Specific training simulations
* **Training Type:** Category of training
* **Training with Recipe:** Simulations that include scenarios
A training simulation represents a call type (e.g., Refund Request). Recipes are the scenarios within it (e.g., refund via store credit, refund to card, overcome objection with discount).
Add organization-specific filters for live calls (e.g., hire date, ad campaign, sales closed) by sending custom metadata via API.
[Add metadata to calls](/guides/add-call-metadata)
### Using Filters
**Apply Filters:**
1. Click **Add Filter** to open the filter menu
2. Select your desired filter options
3. Click **Apply Filter** to update the dashboard
**Edit Active Filters:**
Click any active filter pill to adjust it directly without reopening the filter menu.
**Reset Filters:**
Click **Reset Filters** to clear all active filters and return to default view.
Save frequently used filter combinations for quick access. Your last-used preset automatically applies when you load the dashboard.
1. Configure your desired filters
2. Click **Apply Filter** to update the dashboard
3. Click the menu icon (⋮) in the right corner of the filter bar
4. Select **Save as Preset**
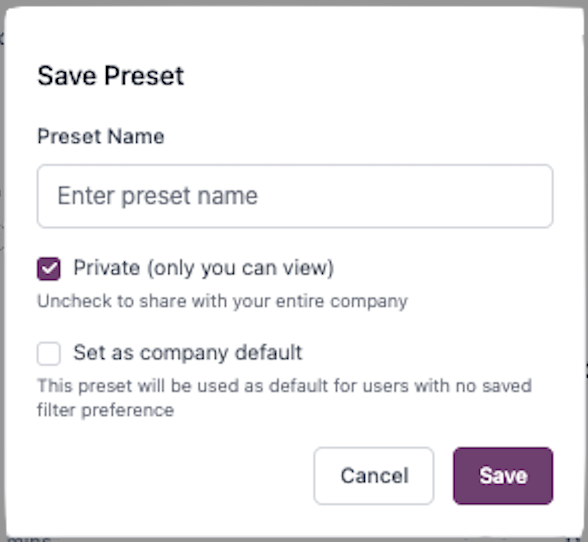 5. Enter a preset name and choose privacy settings:
* **Private (default)** - Only you can view. Uncheck to share with your entire company
* **Set as company default** - Automatically applies for users with no saved filter preferences
Only admins can set a preset as the company default.
Click the menu icon (⋮) in the right corner of the filter bar and select a preset from the **Presets** list to instantly apply it.
Contact your Reddy Project Manager to configure organization-wide default filter presets or adjust the default date range.
## Viewing Call Records
Click **View** on any call record to open the detailed QA page.
**QA Checklist:**
Review all QA items with Pass/Fail/Review statuses for the call.
**Search QA Items:**
Use the search bar to quickly find specific checklist items.
**Filter by Section:**
View QA items by section or select "All Sections" for the complete checklist.
**Review Flags:**
QA items marked for review appear with a flag icon, indicating they need manager attention.
**Audio Playback:**
All simulations and live call records include audio playback. Play, pause, skip forward/backward through the recording.
**Screen Recording (System Simulations):**
System training simulations include screen recording playback, allowing you to see exactly what the agent saw and did during the simulation.
**Volume Control:**
Adjust volume or mute audio.
**Playback Speed:**
Control playback speed for efficient review.
**Agent Strengths:**
Highlights what the agent did well during the call.
**Agent Areas of Improvement:**
Identifies coaching opportunities and specific actions for improvement.
**Call Summary:**
Overview of the customer interaction, key discussion points, and resolution details.
**QA Item Breakdown:**
* **Missed QAs:** Requirements not completed (shown in red)
* **What Went Well:** Requirements completed successfully (shown in green)
**Customer Highlight:**
Key customer insights or notable moments from the call.
**Call Tags:**
Auto-generated tags categorizing call content for filtering and reporting.
Feedback summaries are customized for your organization. Contact your Reddy CSM to configure summarizations for your team's specific needs.
**Full Conversation:**
Read the complete call transcript with timestamps.
**Speaker Labels:**
Clearly labeled agent and customer dialogue.
**Search Transcript:**
Find specific keywords or phrases within the conversation.
**Scroll to Timestamp:**
Click any timestamp to jump to that moment in the recording.
**AI-Powered Analysis:**
Ask questions about the specific call to get instant insights.
**Suggested Prompts:**
Pre-configured questions help you quickly analyze key aspects:
* What were the customer's main concerns, and how did the agent respond?
* Why did the customer call?
* How was the call resolved or addressed?
* What went well, and what could be improved?
**Custom Queries:**
Type your own questions to extract specific information from the call.
Navigate and control calls faster with keyboard shortcuts—available on the QA Details page for both live and training calls.
**Access Shortcuts:** Press **Shift + ?** on any call QA details page to open the shortcut menu.
**Tab Navigation:**
* **Q:** QA Scorecard
* **R:** Recording
* **S:** Summary (Insights)
* **T:** Transcript
* **C:** Chat
**Audio Controls:**
* **Space:** Play/Pause
* **M:** Mute/Unmute
* **←:** Skip Back 5s
* **→:** Skip Forward 5s
* **↑:** Volume Up
* **↓:** Volume Down
**Help:**
* **?:** Show keyboard shortcuts
* **Esc:** Close modal
Hotkeys are disabled while typing in input fields.
## FAQ
Yes. Use the export function on the main dashboard to download filtered call data as a CSV file.
On the QA Scorecard tab, click the flag icon next to any QA item to mark it for review. This helps track items that need additional attention or discussion.
[Learn more about submitting QA corrections](/manual/submit_qa_flag)
For multi-call analysis, use the Chat with Transcripts feature to query data across multiple call records simultaneously.
[Chat with multiple call records](/manual/chat-with-transcripts)
Ensure calls are being recorded through your integration. Contact your Reddy Project Manager if recordings are consistently missing.
5. Enter a preset name and choose privacy settings:
* **Private (default)** - Only you can view. Uncheck to share with your entire company
* **Set as company default** - Automatically applies for users with no saved filter preferences
Only admins can set a preset as the company default.
Click the menu icon (⋮) in the right corner of the filter bar and select a preset from the **Presets** list to instantly apply it.
Contact your Reddy Project Manager to configure organization-wide default filter presets or adjust the default date range.
## Viewing Call Records
Click **View** on any call record to open the detailed QA page.
**QA Checklist:**
Review all QA items with Pass/Fail/Review statuses for the call.
**Search QA Items:**
Use the search bar to quickly find specific checklist items.
**Filter by Section:**
View QA items by section or select "All Sections" for the complete checklist.
**Review Flags:**
QA items marked for review appear with a flag icon, indicating they need manager attention.
**Audio Playback:**
All simulations and live call records include audio playback. Play, pause, skip forward/backward through the recording.
**Screen Recording (System Simulations):**
System training simulations include screen recording playback, allowing you to see exactly what the agent saw and did during the simulation.
**Volume Control:**
Adjust volume or mute audio.
**Playback Speed:**
Control playback speed for efficient review.
**Agent Strengths:**
Highlights what the agent did well during the call.
**Agent Areas of Improvement:**
Identifies coaching opportunities and specific actions for improvement.
**Call Summary:**
Overview of the customer interaction, key discussion points, and resolution details.
**QA Item Breakdown:**
* **Missed QAs:** Requirements not completed (shown in red)
* **What Went Well:** Requirements completed successfully (shown in green)
**Customer Highlight:**
Key customer insights or notable moments from the call.
**Call Tags:**
Auto-generated tags categorizing call content for filtering and reporting.
Feedback summaries are customized for your organization. Contact your Reddy CSM to configure summarizations for your team's specific needs.
**Full Conversation:**
Read the complete call transcript with timestamps.
**Speaker Labels:**
Clearly labeled agent and customer dialogue.
**Search Transcript:**
Find specific keywords or phrases within the conversation.
**Scroll to Timestamp:**
Click any timestamp to jump to that moment in the recording.
**AI-Powered Analysis:**
Ask questions about the specific call to get instant insights.
**Suggested Prompts:**
Pre-configured questions help you quickly analyze key aspects:
* What were the customer's main concerns, and how did the agent respond?
* Why did the customer call?
* How was the call resolved or addressed?
* What went well, and what could be improved?
**Custom Queries:**
Type your own questions to extract specific information from the call.
Navigate and control calls faster with keyboard shortcuts—available on the QA Details page for both live and training calls.
**Access Shortcuts:** Press **Shift + ?** on any call QA details page to open the shortcut menu.
**Tab Navigation:**
* **Q:** QA Scorecard
* **R:** Recording
* **S:** Summary (Insights)
* **T:** Transcript
* **C:** Chat
**Audio Controls:**
* **Space:** Play/Pause
* **M:** Mute/Unmute
* **←:** Skip Back 5s
* **→:** Skip Forward 5s
* **↑:** Volume Up
* **↓:** Volume Down
**Help:**
* **?:** Show keyboard shortcuts
* **Esc:** Close modal
Hotkeys are disabled while typing in input fields.
## FAQ
Yes. Use the export function on the main dashboard to download filtered call data as a CSV file.
On the QA Scorecard tab, click the flag icon next to any QA item to mark it for review. This helps track items that need additional attention or discussion.
[Learn more about submitting QA corrections](/manual/submit_qa_flag)
For multi-call analysis, use the Chat with Transcripts feature to query data across multiple call records simultaneously.
[Chat with multiple call records](/manual/chat-with-transcripts)
Ensure calls are being recorded through your integration. Contact your Reddy Project Manager if recordings are consistently missing.